Case properties dialog box
This topic provides an overview of the Case properties dialog box and all the settings and buttons on it. However if you require step-by-step procedures on creating cases using the View i-cases screen refer to To create a new case.
This feature requires option E14 Sentinel. If you do not have this option this feature is not available.
The Case properties dialog box is opened from the Case menu on the View i-cases screen. It allows you to edit the case type and case name that you originally entered when you created the case using the Add Case dialog box. It also allows you to change the folder in which the case was originally created.
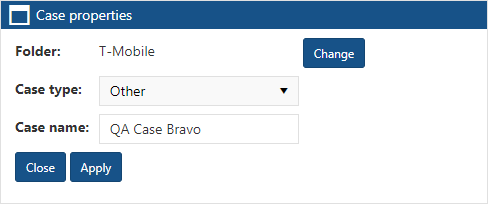
Click to open the Change parent folder dialog box. This allows you to edit which folder you want your case in.
This setting is mandatory. This setting allows you to change the original case type you selected when you created the case.
This setting allows you to edit the original case name if you feel it is no longer appropriate.
When you created the case you may have either entered a case name that was relevant to you at the time or you may have allowed OSS-ESPA to automatically create one for you which is titled using the format "Case <n>", where <n> is a number which increments each time a user on your OSS-ESPA account selects to automatically generate a case name.
Click to apply any changes you have made. The dialog box closes automatically.
Click to close the dialog box without making any changes and to return to the View i-cases screen.